Access to EndNote
Students and staff at the University of Oslo and Oslo University Hospital have free access to EndNote. EndNote is compatible with Windows and MacOS and can be used with both Microsoft Office and OpenOffice.
If you have an older version of EndNote and are about to install a new version, it is important to uninstall the older version first.
University of Oslo
For your own PC or Mac
You have three different options:
- Download EndNote from UiO for Windows or Mac.
- Application kiosk gives you access to your home area and a large amount of programs without having to install the programs on the machine you are using.
- Remote Desktop is a tool that you use to remotely log on to computers, so you can access to a computer other than the one you are sitting at.
If you need help, please contact UiO IT services.
On UiO owned computers
You can find EndNote on most computers on campus:
- PC: Start > EndNote > EndNote
- Mac: Finder > Applications > EndNote > EndNote
If you cannot find EndNote, you can can install it:
- PC: Software Center
- Mac: Managed Software Center
Oslo Univerity Hospital
For your own PC or Mac
To install EndNote on your personal computer og Mac:
- Go to the following web page: http://www.alfasoft.com/no/endnote-hso.html
- Register with your work e-mail address. Private e-mail addresses does not work. It is important that you register with an adress that ends with either sshf.no, siv.no, sthf.no, ahus.no, ous-hf.no, sykehuset-innlandet.no, so-hf.no, vestreviken.no, sunnaas.no, sykehuspartner.no, kreftregisteret.no, rr-research.no eller oslo-universitetssykehus.no.
- After registering you will recieve an e-mail. Check your spam mail if you have not recieved this e-mail. Foreward the e-mail to a private address you can read on your personal computer or Mac. Follow the link in the e-mail.
- You can log on to the Alfasoft support center at any time. There will be a category named "Helse Sør-Øst HF" where you will find your licence letter and instructions for downloading and installing EndNote.
OUS computer
You can find EndNote on most computers at the hospital:
Start > Mine administrative programmer > EndNote OUS
Have you recently upgraded to Windows 10? After upgrading, you will no longer have access to EndNote until you do the following:
- Go to "Min Sykehuspartner" and "Bestille tilganger (BAT)"
- Search for "EndNote OUSHF Win10" and select it.
- Press "Bestill" and you will automatically be granted access.
- Wait a while (3 hours) and log off and then on again.
You will now have access to EndNote, Word with EndNote, PowerPoint with EndNote.
In case of problems, please contact Sykehuspartner by phone: 32 23 53 30
Start using EndNote
Start the EndNote program:
- UiO: Start > EndNote > EndNote
- OUS: Start > Mine administrative programmer > EndNote OUS
- Mac: Finder > Applications > EndNote > EndNote
You must accept the licence agreement the first time:
- I accept the licence agreement.
- Next.
If the "Welcome to EndNote" window pops up, you can choose to create an EndNote Online account, but this is not required to use the EndNote program. You can also do this later. Learn how to create an account here. Click on the X in the corner to close the box.
If a window pops up asking you to update EndNote, you can close that too.
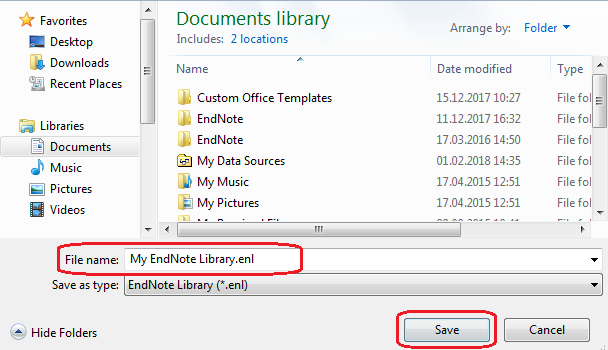
Create a library:
- Choose File > New…
Windows:
Mac:
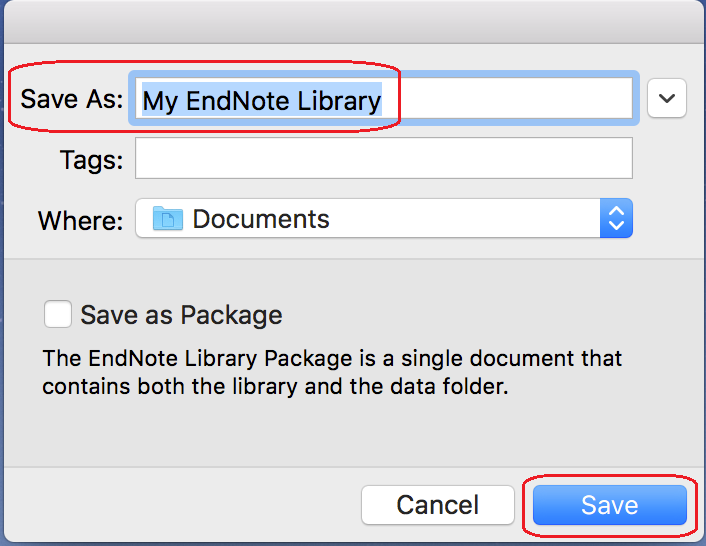
- Name your library. "My EndNote Library" is the default. Change this to avoid clutter.
- Choose where you want to store your library. We recommend saving to your UiO / OUS home area. The library will be available from other machines on the same network. If you work on your own PC / Mac you can save to Documents or other suitable places. Do not store your library in Dropbox, OneDrive, iCloud or other cloud services.
- Save
About the EndNote Library file and data folder:
- An EndNote library consists of an enl file (the database itself) and an associated data folder that share the same name and location.
- The data folder contains all files in the library (pdf files of articles or figures and images that are attached to the references in the library).
- The enl file and the data folder must always be stored in the same place for the library to function. If you need to copy or move the library, both files must be included.
EndNote Interface
Layout
Group panel: The references can be organized into custom groups. The group panel displays the custom groups and sets, as well as EndNote-defined views.
The references panel displays a list of all the references in the library. You can change the order of the columns and select other display fields by selecting from the top menu:
Windows: Edit > Preferences > Display fields
Mac: EndNote > Preferences > Display fields
The view panel has the Reference, Preview, and Attached PDFs options. The reference tab shows the contents of the reference. The Preview tab shows the reference formatted according to the selected output style. The Attached PDFs tab displays any full-text articles that you have imported to the library.
EndNote 20: the view panel opens when you double-click a reference. Summary provides an overview of the reference. If you have PDFs or other attachments, they are visible here. Use Edit to make changes to the reference itself. You get a preview of the reference in a specific style at the bottom of the panel.
The search panel provides more options for searching your library than the small Quick Search box on the toolbar.
Windows: Show or hide the search panel by clicking the Show / Hide Search Panel button on the toolbar.
Mac: Show or hide the search panel by clicking the Layout button on the toolbar.
EndNote 20: choose between Advanced or Simple search.
EndNote's interface can be customized to your workflow. You do this by changing the Layout.
Windows: Change the layout with the button in the bottom right corner.
Mac: Change the layout with the button in the upper right corner.
EndNote 20 does not have this option.
The toolbar
Windows:

Mac:
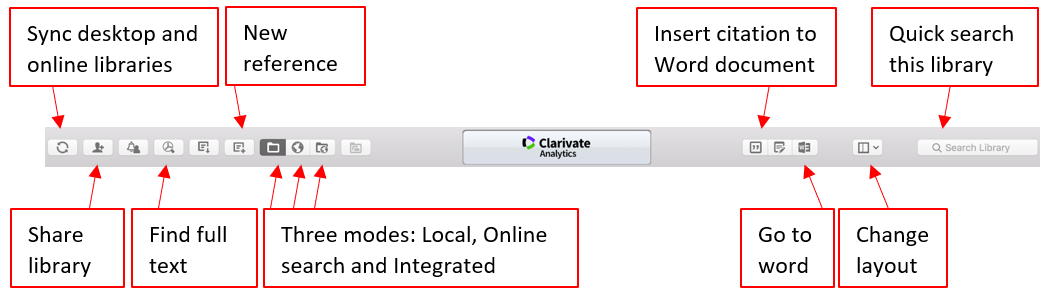
EndNote 20 has a more simple toolbar:
- Add a new reference to the selected group
- Share this group
- Export references to another file or library
- Search the Web for full text documents for the selected references
- Create a Web of science citation report from the selected references
Three modes – local, online and integrated
The first three buttons on the left of the toolbar represent three different working modes:
Local Library Mode: Your EndNote Library.
Online Search Mode: Allows you to search external databases (Web of Science, PubMed etc.), and import the search results to your library.
Integrated Library & Online Search Mode: Combines the other two modes and automatically imports all search results to your library. Not recommended unless you know exactly what you are looking for.
EndNote 20: here there is only one integrated mode.
Output Style
Output Style determines the type of reference style displayed in the Preview tab of the view panel. Approx. 500 of the most popular styles are available. Choose Output Style:
Windows: Use the drop down menu on the toolbar to change the style.
Mac: Go to the Preview view in the view panel and change the style.
EndNote 20: Select Output style in the View panel for a preview.
To change the Output style of your document, see the EndNote and Word guide.
Settings
If you change the settings, the change only applies to the machine you are on and to the same user.
Import Journal Term List
EndNote has its own lists of correct journal names (Term Lists). The lists are included with the program, but must be activated.
Import the list when you create a new library and before posting references.
- Tools > Define Term Lists:
EndNote 20: Library > Define Term Lists... - Select the Lists tab and select Journals
- Import List
- You need to look up the journal list in the file archive. It is located in the "Terms Lists" folder located at the same location as EndNote was installed, usually on this file path:
Windows (UiO): C:\Program Files (x86)\EndNote\Terms Lists
Windows (OUS): P:\Mine Dokumenter OUS\EndNote\Term Lists
Mac: ApplikasjonerProgrammer/Applications > EndNote > Terms - Open the Terms Lists folder and select your subject area, click Open.
Import only one list. If you work in several disciplines, select the subject from which you get the most references. When importing multiple lists, conflicts may arise between them.
Preferences
Windows: Edit > Preferences
Mac: EndNote > Preferences
Below are some recommended settings:
Display Fields - Use the drop-down menus to select which fields from the references to be visible in the reference panel (eg: Author, Year, Journal, Title).
Duplicates - Tick the Author, Year, Title, Volume and Issue fields. This allows EndNote to use these fields to find references that appear multiple times in the library.
It is important to remove these before you start using the references in Word. EndNote has its own feature for this. [lenke]
Find Full Text - Check all boxes and enter the following address in OpenURL Path: http://openurl.bibsys.no/openurl This makes it easy to look up references in Oria.
PDF Handling - Choose to rename the PDFs when importing. This makes it easier to recognise the PDFs outside EndNote.
It is also possible to select the automatic import of PDF files from a specific folder (eg Downloads).
Sync (connect to EndNote Online) - Here you can register as an EndNote Online user by pressing Enable sync and Sign Up. If you already have an EndNote Online account, you can log in with your username and password. After this, the library in the EndNote program and the EndNote Online library will be synchronized. Read about EndNote Online here.